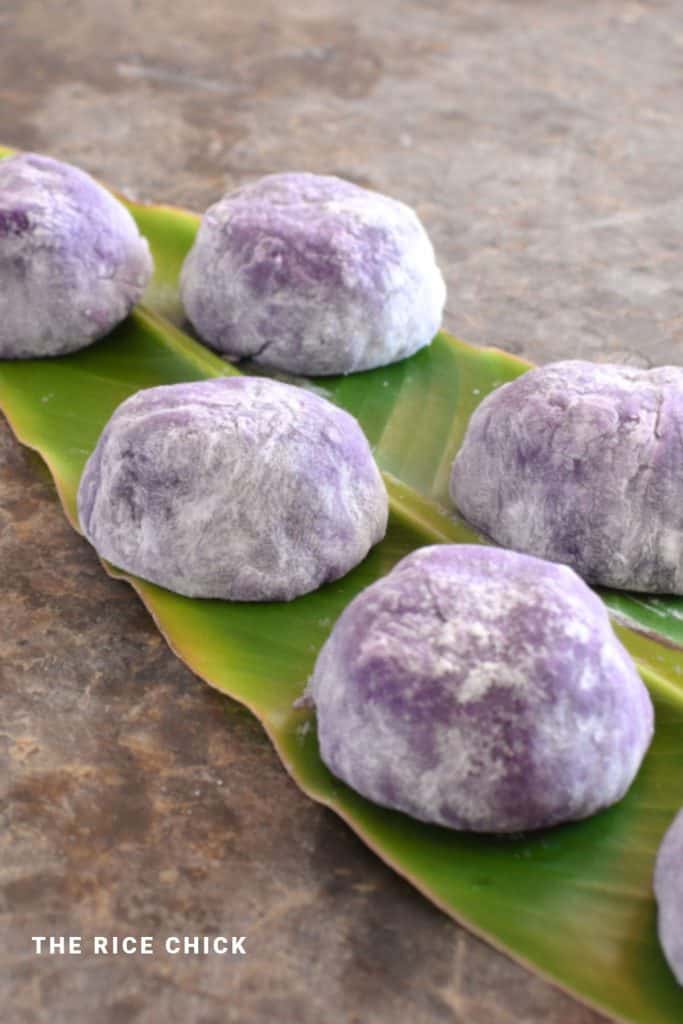
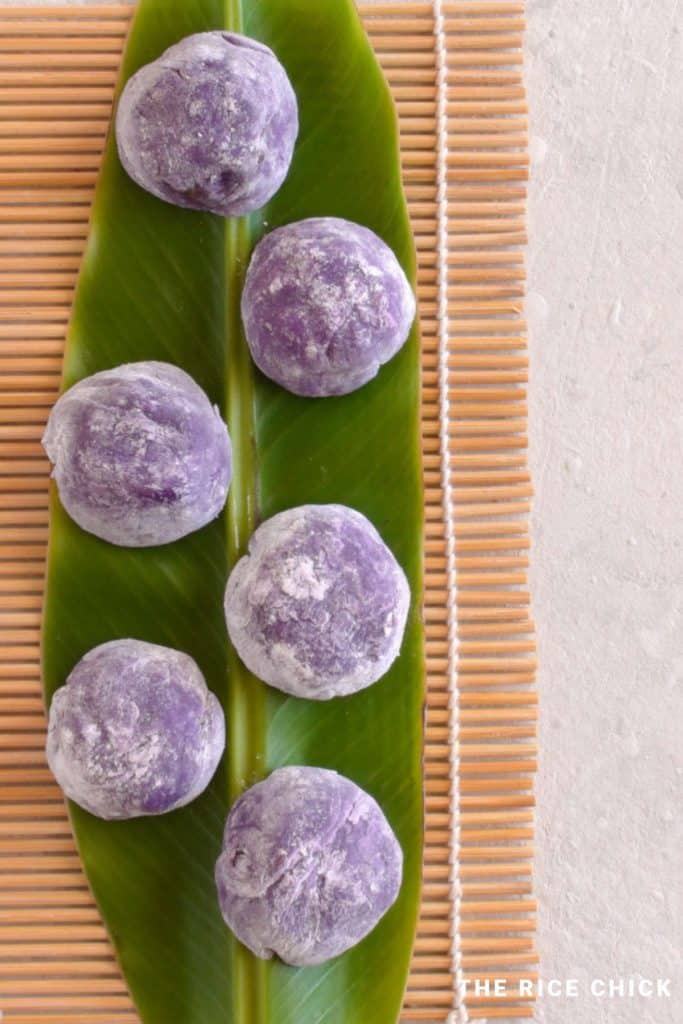
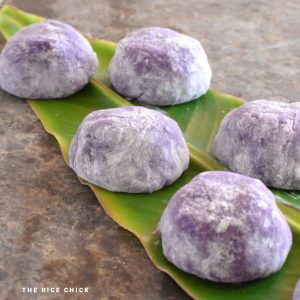
Get ready to be blown away by this bright and vibrant ube mochi.
It's irresistible to both look at and eat.
Making this delicious mochi is easy, you'll be wanting it all the time.
Jump to:
Experience the ultimate harmony of simplicity and flavor with ube mochi.
These soft, chewy rice cakes, filled with sweet red bean paste, are not only delicious but visually captivating, making them the perfect treat for any social gathering.
Ube mochi is so bright and colorful but that's not all this little gem of a treat is!
This Japanese rice cake can be whipped up in under 35 minutes and it is deliciously tasty.
Chances are, you've savored your fair share (or, let's be honest, if you're like me, a whole bunch) of mouthwatering mochi.
These delicious treats, commonly enjoyed in Japan and found in Asian supermarkets around the world.
But for those of you who are not too sure about what mochi is, read on.
What is mochi?
Mochi is a small soft rice cake that originates from Japan. It can be sweet or savoury, filled or served plain.
Mochi is made of glutinous rice flour, sugar, and water.
You can't use ordinary rice flour to make mochi because it does not give the same texture when it is cooked.
By using glutinous rice flour (mochiko flour), you end up with a soft, chewy, and slightly stretchy mochi.
Popular mochi flavors include chocolate, vanilla, mango, Nutella, Sakura, and my favourite, sweet red bean paste.
Mochi can come in many different forms. From donuts, muffins, and cupcakes, to butter mochi.
What is Ube?
Ube, also known as purple yam, is a root vegetable renowned for its captivating purple color and sweet flavor.
Originating from the Philippines, ube has gained popularity worldwide for its unique characteristics.
Its vibrant purple hue, ranging from pale lavender to deep violet, adds a touch of visual allure to culinary creations.
Beyond its aesthetic appeal, ube offers a rich and distinct taste, often described as subtly sweet with hints of vanilla.
From traditional desserts like ube halaya and ube ice cream to modern creations like ube cheesecake and ube pancakes, this versatile ingredient has found its way into various culinary delights, delighting taste buds and capturing hearts around the globe.
If you are a lover of ube like us, you might also like to try ube butter mochi and ube baked mochi donuts.

Why You'll Love This Recipe
You'll love this easy ube mochi recipe because it only takes 20 minutes to prepare and less than 10 minutes to cook.
There are also only 7 ingredients needed for this recipe. Most of the ingredients you may already have, and this recipe is budget friendly.
What's more, this little treat makes for a simple and yummy treat or dessert which is so beautiful to look at.
I mean, come on, who can resist taking a bite of this marvellous-looking mochi?
This recipe is also vegan-friendly, gluten free, and vegetarian. Anyone can enjoy this quick and easy mochi recipe.
Customize the filling of this mochi to your liking. Instead of red bean paste, you could use black sesame paste, mango pieces, or even ice cream.
Cost To Make
Estimated cost = $1.75, or $0.08 a mochi
Ingredients
Please note that below is a guide for some of the ingredients we used in the recipe. The printable recipe further down the page has the complete list of ingredients, including quantities and step-by-step instructions.

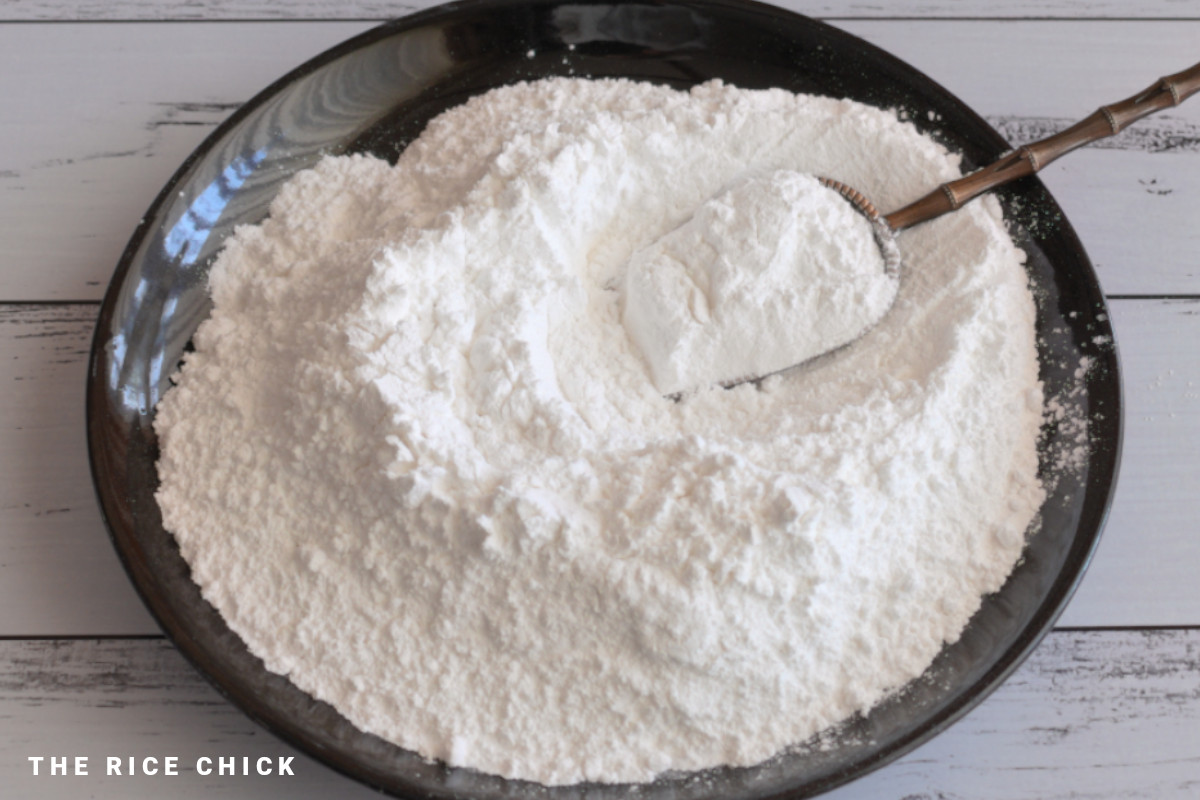
- Glutinous rice flour (mochiko flour): It is important to use glutinous rice flour as opposed to ordinary rice flour. By using glutinous rice flour it gives the mochi its chewy texture.
- Water: This helps the dough bind together.
- Sugar: I find it best to use a fine sugar such as caster sugar.
- Ube extract: If you are unable to find ube or ube paste, you can use ube extract.
- Salt: This will enhance the flavors of the dough.
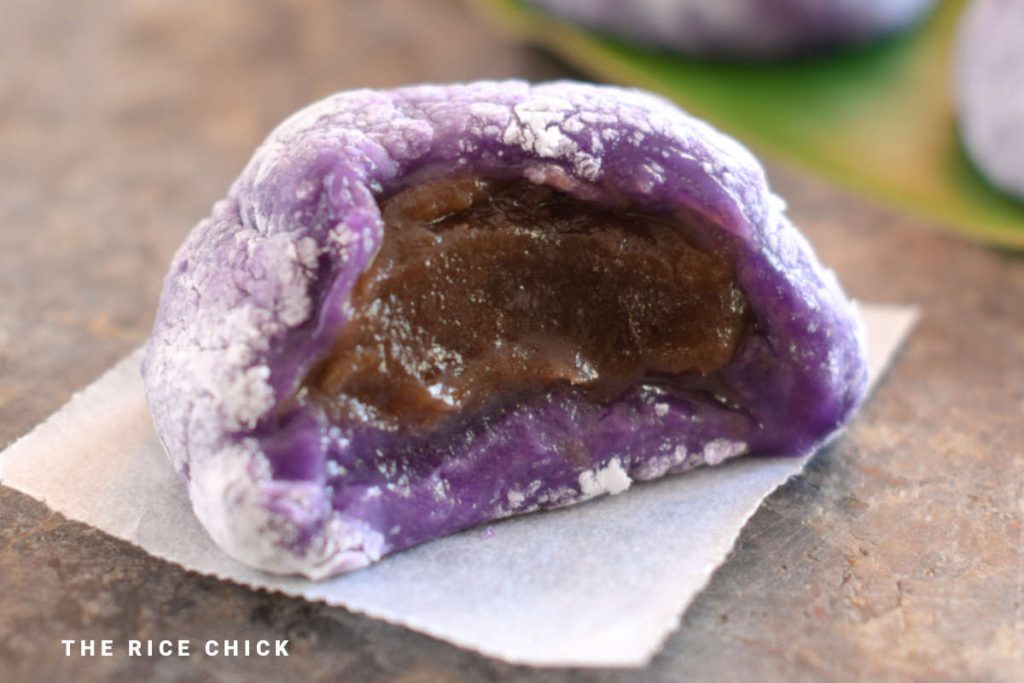
- Red bean paste: This is the filling of this ube mochi. The two common types of red bean paste are Japanese and Chinese sweet red bean paste.
Chinese sweet red bean paste can contain lard which makes it a lot richer than Japanese red bean paste. For this recipe, I used a Japanese sweet red bean paste.
If you want you do not need to fill the mochi as the ube extract provides flavor itself to the mochi dough.
You can also experiment with different filling types such as Nutella or a sweet black bean paste.
- Corn starch: Be sure to have some corn starch on hand to dust your work surface and your hands. This will make working with the mochi a lot easier.
This is because it will make it less likely the dough will stick to your hands or work surface.
If you find you have too much corn starch on your dough after you have rolled and filled the mochi, simply lightly dust it off with a small pastry brush.
Instructions
Step One: Place the glutinous rice flour, water, sugar, ube extract and salt into a microwave-safe bowl.
Mix the ingredients until it is lump-free.
If you are having trouble removing some lumps, bring them to the side of the bowl and press them against the side with the back of a spoon or spatula.
Step Two: Place the bowl on a plate and cover the bowl with a microwave-safe lid. Microwave for about 1 minute and 30 seconds to 2 minutes, until the mixture begins to form a paste.

The reason I recommend using a plate under the bowl is to make it easier to remove from the microwave. The bowl and dough mixture will get very hot when heated.
So, ensure you carry the bowl out of the microwave using the plate.
If you do not have a plate that can hold the bowl, use a dry tea towel to remove the bowl from the microwave.
Step Three: Remove the mixture from the microwave and stir the mixture.
Be careful when you open the lid as the mixture will be very hot and steamy. Open the lid away from you to avoid steam blowing towards you.
Step Four: Once you have stirred the mixture, place in the microwave again and heat for another 15 - 30 seconds. Remove from microwave and stir until there is no more liquid and the dough has come together.
Allow the dough to cool slightly so that it is easier to handle.
Step Five: Lightly dust your workspace with corn starch. It will also help if you lightly dust your hands with corn starch as well.
Step Six: Flatten the mochi dough into a rectangle that is about 0.5 mm (0.019 inches) thick.
Step Seven: Using a 6cm (2.4 inches) cookie cutter, cut the dough into circles. With any leftover dough, combine it into one ball and then make it into another rectangle.
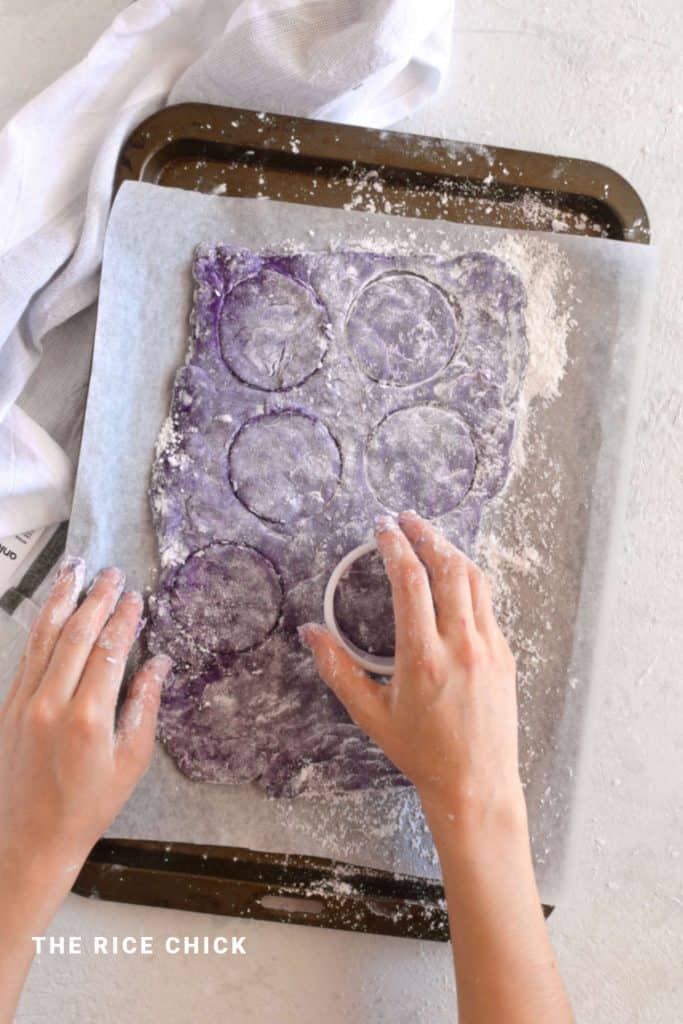
Repeat cutting the dough into circles until the dough is all used up.
Step Eight: In the center of each circle, fill with 1 teaspoon of sweet red bean paste. Fold the sides of the circle into the middle and pinch together to close the dough. Repeat for all balls.
Step Nine: Coat each mochi lightly with some corn starch. This will help them to not stick to each other when you store them or serve them.
Step Ten: Place seam side down and serve.
Tips for Success
- To make the mochi dough easier to work with, make sure you dust your hands and workspace with corn starch. This will make it less likely the dough will stick to you.
- If you want a darker color to your mochi, you can experiment by adding more ube extract. I found that after making the mochi the color got slightly darker over time without adding any more extract.
- The two common types of red bean paste are Japanese and Chinese sweet red bean paste. Chinese sweet red bean paste can contain lard which makes it a lot richer than Japanese red bean paste. For this recipe, I used a Japanese sweet red bean paste.
Substitutions / Variations
You can fill ube mochi with almost anything you can think of.
Other filling alternatives include sweet black bean paste, chocolate, Nutella, a thick custard, or even peanut butter.
Storage
Homemade mochi can be stored at room temperature for up to 3 to 4 days in an airtight container.
They can also be stored in the fridge in an airtight container for 2 to 3 days but can become hard quicker than being left out at room temperature.
Homemade mochi can be frozen for up to 3 months but it can become soggy when defrosted. To freeze the mochi, wrap each mochi individually in plastic wrap or separate them with parchment paper.
If you keep the mochi for too long in the freezer they can get freezer burn or lose flavor.
To defrost the mochi, naturally bring them to room temperature. I do not recommend heating them in the microwave.
FAQ
It is best to eat ube mochi fresh. If you have leftover mochi place it in an airtight container and store it at room temperature.
Leftover mochi can last up to 3 - 4 days.
Yes, it can. However, if you refrigerate ube mochi it is likely it will harden and dry out quicker.
Made this recipe? Let us know how it went in the comments below! We'd love to hear how it turned out.
More Sweet Recipes
- Milk Rice Cake
- Mochi Pancakes
- Chocolate Peanut Butter Rice Krispie Treats
- Arroz Doce
- Rice Flour Pancakes
- Banana Cinnamon Baked Rice Flakes
- Matcha Baked Mochi Donuts
- Matcha Cookies
- Mochi Waffles
- Flaked Rice Pudding
- Condensed Milk Brownies
- Dairy Free Chocolate Chip Muffins
- Chak Hao Kheer
- Rice Cake Toppings
Recipe
Ube Mochi
Ingredients
- 100 grams (3.53 ounces) glutinous rice flour (mochiko flour)
- 180 ml water
- 50 grams (1.76 ounces) sugar
- ¼ teaspoon ube extract
- Pinch of salt
- 130 grams (4.59 ounces) sweet red bean paste*
- Corn starch to dush work surface
Instructions
- In a medium microwave-safe bowl, combine the glutinous rice flour, water, sugar, ube extract and salt. Mix until there are no lumps.
- Cover the bowl with a microwave-safe lid and place the bowl on a plate. Microwave for about 1 minute and 30 seconds to 2 minutes, until the mixture begins to form a paste.
- Remove the plate and bowl from the microwave and stir the mixture. Be careful when you open the lid as the mixture will be very hot and steamy.
- Place in the microwave again and heat for another 15 - 30 seconds. Remove from microwave and stir until there is no more liquid and the dough has come together. Allow the dough to cool slightly.
- Lightly dust your workspace with corn starch. Flatten the mochi dough into a rectangle that is 0.5 mm thick.
- Using a 6cm (2.4") cookie cutter, cut the dough into circles. With any leftover dough, combine it into a ball and make it into another rectangle. Repeat cutting the dough into circles until the dough is all used up.
- In the center of each circle, fill with 1 teaspoon of red bean paste. Fold the sides of the circle into the middle and pinch together to close the dough. Repeat for all balls.
- Coat each mochi lightly with some corn starch. This will help them to not stick to each other when you store them or serve them. Place seam side down and serve.


Carole says
I made these for a party the other day and had to come back and say thanks for the recipe. All of my guests loved them so much, I wish I had made more!
Pam says
I think I will use ube hayala for the filling ????
Emily says
Yes, you could use ube hayala.